Real-Time Computer Vision on MacBook Pro with YOLO
A quick tutorial on getting real-time object detection working on a MacBook with 'YOLO' package and full CUDA support.
April 27, 2018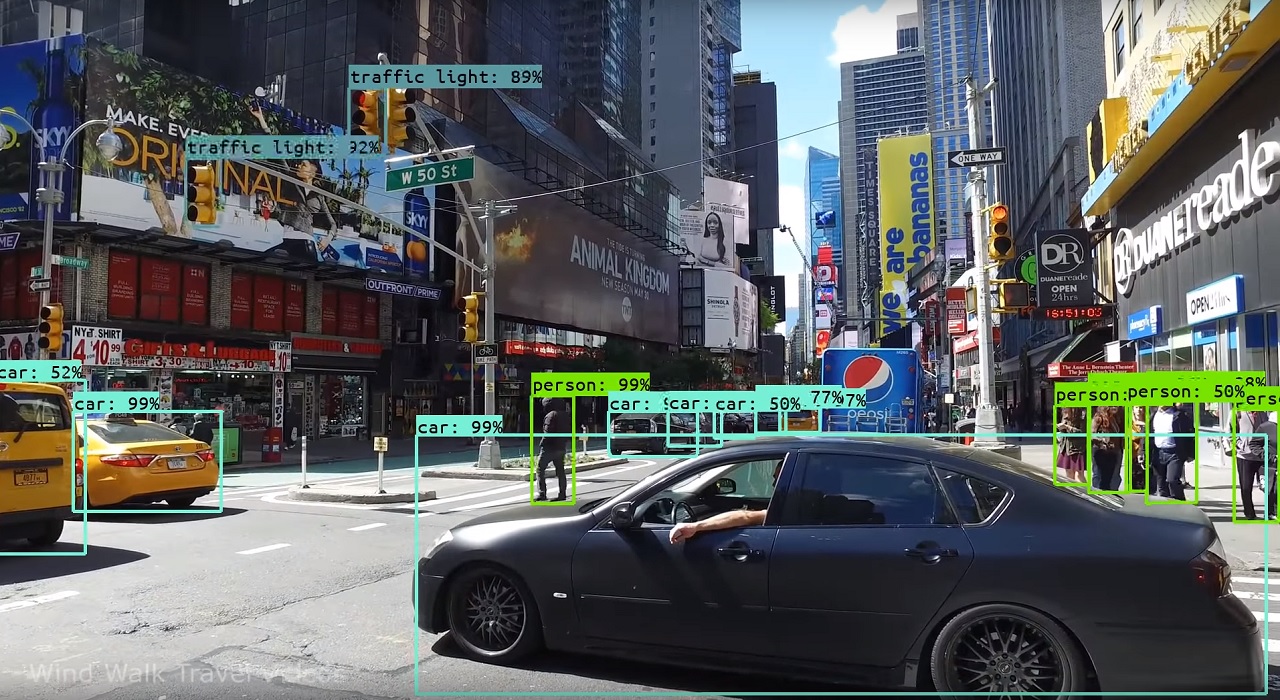
After seeing deepython.com’s “A Computer Vision System’s Walk Through Times Square” on Youtube (which has sadly since been removed), I wanted to learn how to have a real-time computer vision system on my MacBook Pro as well.
I found YOLO, a real-time object-detection system created by Joseph Redmon. I made a few modifications, but here is the complete installation process from beginning to end since I couldn’t find anything similar online.
Changelog
- Added .avi video export in MJPG codec in image.c
- Added start.sh bash file to start program easier
- Added percentages to labels
- Changed label font to Courier New Bold
- Fixed makefile lib64 alias
References Used
- MetaKermit’s “Compiling TensorFlow with GPU support on a MacBook Pro”
- PyImageSearch’s “macOS: Install OpenCV 3 and Python 3.5”
- NVIDIA CUDA Toolkit Documentation
- YOLO: Real-Time Object Documentation
Current Setup
At the time of writing:
Model: Late 2013 MacBook Pro Retina 15”
OS: macOS High Sierra 10.13.3
Dedicated graphics: NVIDIA GeForce GT 750M
CUDA Driver Version: 387.128
GPU Driver Version: 387.10.10.10.25.156
A dedicated graphics card is necessary for real-time computer vision classification. Although it’s not needed for rendering photos or videos, I highly reccommend using YOLO only if you have a dedicated graphics card because it speeds up computation considerably.
Prerequisites
- Create an NVIDIA Developer Account
- Create an Apple Developer Account
Both are free and the approval process was instaneous for me, but it could take some time. The Nvidia Developer Account is needed to download the CUDA Deep Neural Network library (cuDNN). The Apple Developer Account is needed to download a previous version of XCode that is compatible with the current version of cuDNN and CUDA driver versions.
Installation Process
1. Install homebrew, homebrew cask, and python3
These instructions come from Metakermit’s post. If you already have Python 3 installed, disregard that command.
/usr/bin/ruby -e "$(curl -fsSL https://raw.githubusercontent.com/Homebrew/install/master/install)"
brew update
brew upgrade
brew tap caskroom/cask
brew install python3
2. Download required libraries and CUDA
brew install python3 coreutils swig llvm bazel
brew cask install java
brew cask install cuda
You will have to go into System Preferences, CUDA, and hit “Install CUDA Update”. The current version is 387.128. Alternatively, you can install CUDA through the CUDA Toolkit (currently 9.1) in NVIDIA’s developer portal.
Next, you need to add the following lines into your ~/.bash_profile. Again, the following code may not be up-to-date in the future, so find the instructions inside the current Installation Guide Mac OS X on NVIDIA’s Developer portal. As of writing, 9.1.85 is the current guide.
export PATH=/Developer/NVIDIA/CUDA-9.1/bin${PATH:+:${PATH}}
export DYLD_LIBRARY_PATH=/Developer/NVIDIA/CUDA-9.1/lib\${DYLD_LIBRARY_PATH:+:${DYLD_LIBRARY_PATH}}
3. Install cuDNN library
NVIDIA cuDNN is a GPU-accelerated library and you need the NVIDIA Developer Account for it. Download the latest version that corresponds to the version of CUDA that you have (at the time of writing, it’s v7.0.5). Following the install guide for the current version, install using the following:
tar -xzvf cudnn-9.0-linux-x64-v7.tgz
sudo cp cuda/include/cudnn.h /usr/local/cuda/include
sudo cp cuda/lib64/libcudnn* /usr/local/cuda/lib64
sudo chmod a+r /usr/local/cuda/include/cudnn.h /usr/local/cuda/lib64/libcudnn*
4. Install an old version of XCode
Go into the Apple Developer portal and download an older version of XCode, which will include the XCode Command Line Tools necessary for CUDA to run. At the time of writing, I’m using XCode 8.3.3 and you just need to rename the .app file so that multiple versions can exist on your machine, otherwise the native Mac App Store will try to upgrade your older version.
You’ll also need to select the older version of XCode Command Line Tools before compiling/running with the following. NOTE the renamed XCode.app file “Xcode833.app”. Replace it with whatever you name it.
sudo xcode-select -s /Applications/Xcode833.app/Contents/Developer
When installing new packages or updating existing software/packages you may run into the following error:
nvcc fatal : The version ('90000') of the host compiler ('Apple clang') is not supported
This means that current version of clang isn’t the most updated version, and you can remedy this by reselecting the most recent version of CLT through:
sudo xcode-select -r
5. Install OpenCV
Before proceeding, remember to reselect the most updated version of CLT/XCode. In order to install OpenCV, you need to install the following dependent files through:
brew install cmake pkg-config
brew install jpeg libpng libtiff openexr
brew install eigen tbb
brew install ffmpeg numpy
And then switch back to the old version of CLT again before proceeding.
6. Compile YOLO
Using Terminal, make sure to go to the directory that you wish to put your project, since we’re going to be cloning this Github respository.
cd /Projects
git clone https://github.com/jacobysuh/computer-vision.git
Then open up Makefile with your favorite text editor and change the following so that the program compiles using OpenCV and CUDA:
GPU=1
OPENCV=1
For whatever reason, compiling with CUDNN=1 doesn’t allow object detection on prerecorded videos, but does seem to work on real-time webcam videos. I can’t figure out why this is the case at the moment. Next, follow up with:
cd computer-vision
make
wget https://pjreddie.com/media/files/yolo.weights
Running YOLO
In order to run YOLO, I added a bash file to make things easier. While still in the same directory, start with:
bash start.sh
It will ask you for an address for a video file, which will run the object-detection on it and then export a video file with bounding boxes and labels in the same directory. If a video is not supplied, the program will run off your webcam and have real-time object-detection.