Twitter Bot with Python and AWS Lambda
Guide for building a Twitter bot with Python that automatically tweets out at certain intervals using AWS Lambda for free
December 02, 2019One of my old roommates in undergrad, Steven, and I used to watch Community quite a lot. It’s one of his favorite TV shows and I’ve come to love it too. I recently came across a Twitter account that tweets out a screenshot from King of the Hill every 30 minutes and I wanted to do something similar for Community. Our finished project can now be found on @Community_Caps. Thanks to Steven for helping and making it possible!
Here’s a quick guide on how create a bot for free using Python and AWS Lambda.
Process Overview
- Link a Twitter developer account it to your Python project using
tweepy - Load your project onto AWS Lambda to automatically tweet for free
This is a two-step process, and the first part of this guide will cover how to post a tweet from Python directly. The second part will cover how to load your bot onto AWS Lambda so that it can tweet regularly using AWS Lambda’s free tier.
Part 1: Twitter Developer and Tweepy
1. Create your Twitter account
First step is to actually create the Twitter account that your bot will be tweeting from on their signup portal. All Twitter accounts must have a unique email address, but if you have a Gmail address, you won’t need to create a new email address for this account.
If your personal address is test@gmail.com, you can simply append a plus sign and any new words. Twitter will treat test+twitterbot@gmail.com as a unique email address, and any emails sent to that address will automatically forward to your original test@gmail.com.
2. Create a Twitter developer account
A Twitter developer account can be on their developer portal. It will be tied to the Twitter account that you created in Step 1.
You’ll need to create an App, which will actually be the app through which our Python program will send tweets. The name of the App will be available underneath the tweet, typically seen as “Twitter Web Client” or “Twitter for iPhone”. You’ll need to fill out a few details about the App you’re creating and approval usually takes <24 hours.
Coincidentally, this is how people create those joke tweets that appear to come from random kitchen appliances, like “Twitter for Samsung 1200W Microwave”.
Once your App is approved, if you go into the “Keys and tokens” tab, you will be able to generate consumer API keys and a pair of access tokens. These keys and tokens are what are necessary for tweeting using tweepy.
3. Connect to Tweepy
In order to tweet from Python, you’ll need the tweepy Python package installed.
pip install tweepy
In your Python program file, import tweepy and the following is necessary:
import tweepy

auth = tweepy.OAuthHandler("XXXXXXXXXXXXXXXXXXX", "XXXXXXXXXXXXXXXXXXXXXXXXXXXXXXXXXXXXXX")
auth.set_access_token("XXXXXXXXXXXXXXXXXXX-XXXXXXXXXXXXXXXXXXXXXXXXXXX", "XXXXXXXXXXXXXXXXXXXXXXXXXXXXXXXXXXXXXX")
api = tweepy.API(auth)
Under OAuthHandler, place your Consumer API keys in the placeholders, and your tokens goes after set_access_token.
In order to actually tweet, the following are examples:
# Standard tweet
api.update_status(status="tweet text")

# Tweet with image
# Note: the image location must be stored locally. It cannot tweet images from web URLs
api.update_with_media("/images/test.jpg", status="tweet text")
tweepy is much more powerful than just the ability to tweet, so I recommend reading through their documentation.
Part 2: AWS Lambda
For my example, I wanted my bot to regularly tweet at a specific interval, so AWS’s free tier of Lambda was perfect.
1. Create an AWS account
Create an AWS account from their portal. Approval will also take <24 hours.
2. Start Lambda and create a function
Once in the AWS Management Console, create a new function within Lambda by searching for Lambda within the AWS Services tab.
Give it a name, and for Runtime, pick whichever version of Python you have. Select “Create Function”.
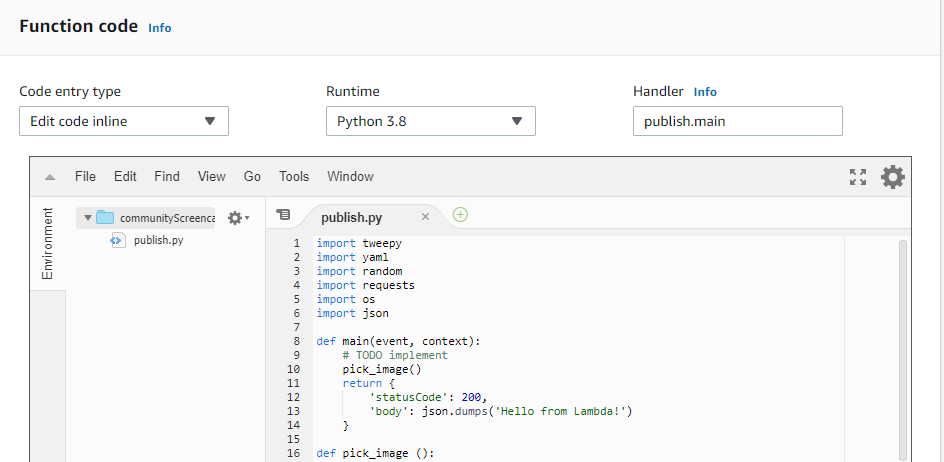
Place your code within lambda_function.py (or you can create your own Python file within the inline code editor), but it’s important to keep the function that returns a status code for Lambda to run. The default example is lambda_handler, although it can be any function name as long as it’s correctly referenced within the Handler field.
The Handler field is the file and function (fileName.functionName) that gets called whenever your Lambda environment is set to run.
Above the return, call your actual function to run. My Function looks as follows, with the example’s lambda_handler function renamed to main:
3. Create Layer
In the above screenshot, several Python packages are imported, but most of them aren’t natively installed on Lambda. Layers house dependencies and can be used by multiple functions, so if you have multiple Twitter bots that all use the same libraries, you won’t need to package them up with the function every time.
The Python libraries will have to be in a zipped folder, within a python subdirectory. You can install tweepy as such:
mkdir -p your-layer/python
pip3 install tweepy -t your-layer/python
cd your-layer
zip -r your-layer.zip python
Within the AWS Lambda dashboard, create a new layer within the Layers section and upload the .zip file.
Back within the Function page, click on the Layers block in the Designer and add your newly created layer.
A test can be run using the Test button at the top to see if everything works. If a Tweet posts on your account, it worked!
4. Add a CloudWatch trigger
In order for the program to run automatically at certain intervals, a trigger needs to be added. Simply create a new CloudWatch Events trigger with the following example rate expressions:
# Every hour
rate(1 hour)

# Every two hours
rate(2 hours)

# Every thirty minutes
rate(30 mins)
Cron can also be used to trigger the Lambda function at specific times throughout the week. This Cron expression generator is helpful for figuring out what to write.
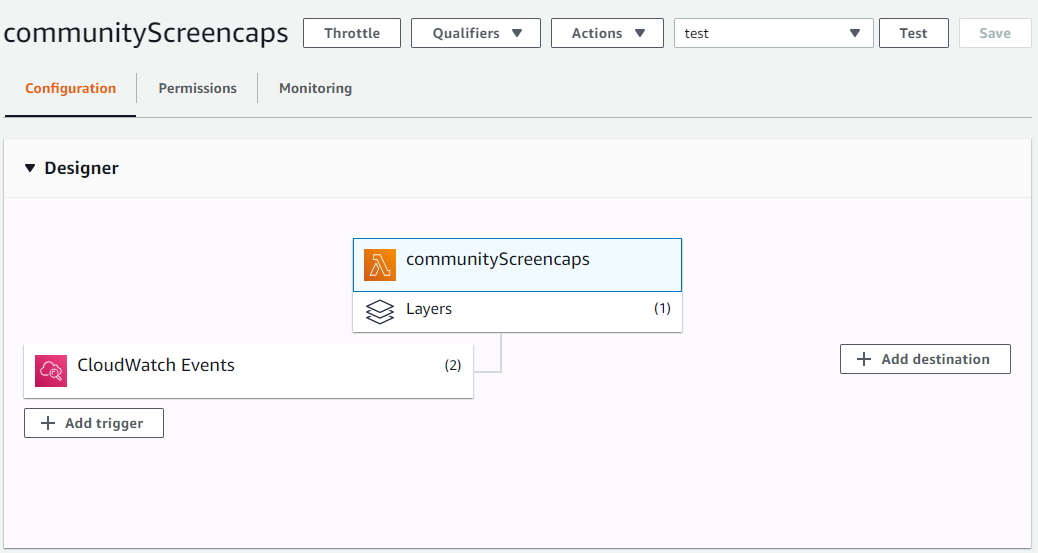
After creating a function, adding a layer, and a trigger (I actually have two for testing purposes), my Designer panel looks like this:
5. Done!
Your Twitter bot should now be up and running!
A couple things to keep in mind is the default timeout setting and billed duration. If you have a larger program and your test timed out, try raising the timeout setting. The default is 30 seconds and your program may require more time to complete.
It’s also important to keep in mind your billed duration (viewable under the Monitoring tab) per trigger, as depending on how long your program runs per trigger and how many triggers per day, there is the possibility of going beyond the free tier of AWS Lambda. Just keep a lookout for how much time/power you’re consuming.
Have fun and best of luck!